Factory Reset Guide
Learn how to factory reset your Astrion Remote HA100. This guide covers both the standard reset via Settings and the hard reset via Recovery Mode.
⚠️ Before You Reset
Factory reset will permanently erase all personal data from your Astrion Remote, including:
- Home Assistant connection — tokens, URLs, and pairing information
- Wi-Fi credentials — saved network passwords
- RosCard configuration — all card layouts and entity bindings
- Physical button mappings — all shortcut configurations
- Personal settings — display, sound, and system preferences
This operation cannot be undone. Before proceeding, ensure you have:
- Your Home Assistant URL and Long-Lived Access Token
- Your Wi-Fi network name and password
- A record of your RosCard card configurations (if you want to recreate them)
⚠️ Important: After factory reset, your Astrion Remote will behave like a brand new device. You will need to go through the full Getting Started process again.
Method 1 — Via Settings
Use this method if your Astrion Remote is responsive and accessible. This is the recommended and safest way to factory reset.
1 Open Settings
From the home screen, pull down from the top to open the quick settings panel. Tap the gear icon (⚙️) in the top-right corner to open the full Settings menu.
2 Navigate to System
In the Settings menu, scroll down and tap System.
3 Select Reset Options
In the System menu, tap Reset Options or Factory Reset (the exact label may vary by firmware version).
4 Confirm Factory Reset
Tap Erase all data (factory reset) or Reset. A confirmation dialog will appear — read the warning carefully and tap Reset to confirm.
5 Wait for Reset to Complete
The remote will restart and begin the reset process. This may take a few minutes. Once complete, the remote will boot to the initial setup screen.
💡 Tip: If you're unable to access Settings because the remote is frozen or unresponsive, use Method 2 below.
Method 2 — Via Recovery Mode
Use this method if your Astrion Remote is unresponsive — screen frozen, won't power on, or stuck on a boot loop.
1 Power Off the Remote
If the remote is on and unresponsive, press and hold the side power button for 10-15 seconds to force it to shut down.
If the remote is completely off, proceed to the next step.
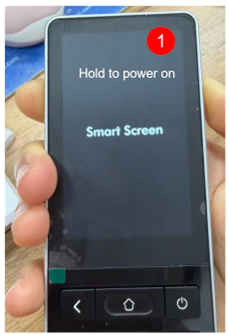
2 Power On and Enter Recovery Mode
Press and hold the side power button to turn on the remote.
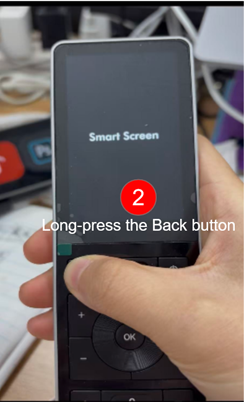
🎯 Key Step: When you see the "Smart Screen" logo appear, press and hold the Back button (↩️).
Keep holding the Back button until the "Smart Screen" logo appears a second time, then release.
3 Navigate the Recovery Menu
You will now see the Android Recovery Menu (a screen with text-only options). Touch input does not work in this mode.
- Use the Down button (▼) on the remote to scroll down
- Use the Up button (▲) to scroll up
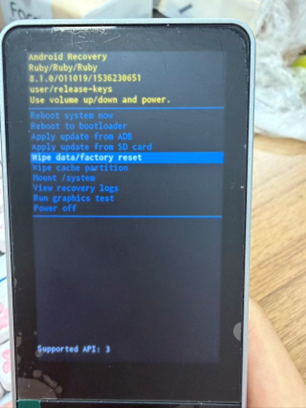
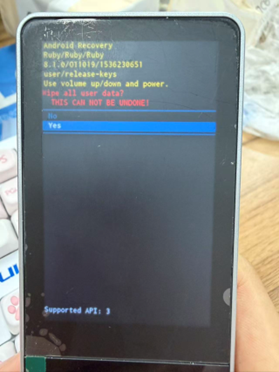
4 Select "Wipe data / factory reset"
Use the Down button to highlight "Wipe data / factory reset".
5 Confirm Reset
Press the side power button to confirm. In the next screen, use the Down button to select "Yes" and press the side power button again to confirm.
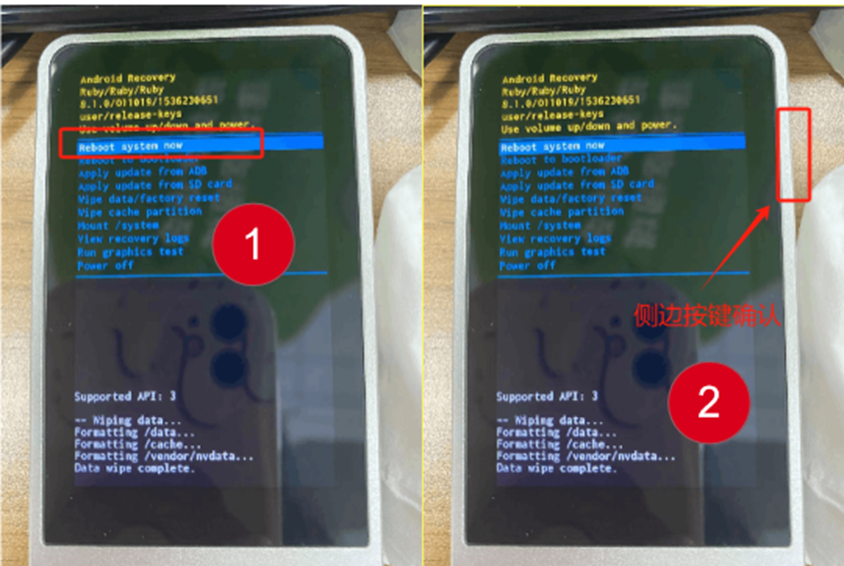
6 Wait and Reboot
The reset process will begin and take a few minutes. When complete, you will return to the Recovery Menu. The initial option "Reboot system now" will be selected by default — press the side power button to reboot.
📌 Key Takeaway: Throughout the Recovery Mode process, always use the side power button to confirm. The OK button in the center of the D-pad will not work in this menu.
After Factory Reset
Your Astrion Remote has been restored to factory settings. To get it back to working condition, follow these steps:
- Step 1: Charge your remote — ensure it has sufficient battery
- Step 2: Power on the remote — complete the initial setup wizard
- Step 3: Connect to Wi-Fi — reconnect to your network
- Step 4: Create a new Long-Lived Access Token in Home Assistant
- Step 5: Pair with Home Assistant — use the new token
- Step 6: Reconfigure RosCard — rebuild your dashboards
- Step 7: Rebind physical buttons — reconfigure your shortcuts
📌 Note: After reset, the remote will not automatically reconnect to Home Assistant. You will need to go through the full pairing process again.
Troubleshooting
Remote Won't Enter Recovery Mode
- Ensure the remote is completely powered off before starting.
- Try the Back button method again — make sure you hold the Back button continuously until the second "Smart Screen" appearance.
- If you see the "Smart Screen" but it doesn't reappear, try again with slightly different timing.
Reset Fails or Gets Stuck
- Ensure the remote has sufficient battery charge (at least 50%).
- Try repeating the reset process from the beginning.
- If the remote is stuck on a screen during reset, press and hold the power button for 15 seconds to force restart, then try again.
Recovery Menu Navigation Doesn't Work
- Remember: you must use the Up and Down buttons to navigate.
- Confirm with the side power button — the OK button in the center of the D-pad will not work.
Remote Won't Boot After Reset
- Ensure the remote is connected to power (charging dock).
- Try pressing and holding the power button for 15 seconds to force a restart.
- If the remote still won't boot, contact Sanytron support for assistance.
🔧 Still Having Issues? Please contact Sanytron support with: your current firmware version (if accessible), a description of what led to the need for a reset, and which recovery method you attempted.
Related resources
Need help with factory reset?
Our support team and community are here to assist you.