Pair Your Astrion Remote with Home Assistant
Complete your Astrion Remote setup by pairing it with Home Assistant. Generate an access token, scan a QR code, and start controlling your smart home — with the dedicated Astrion Launcher interface.
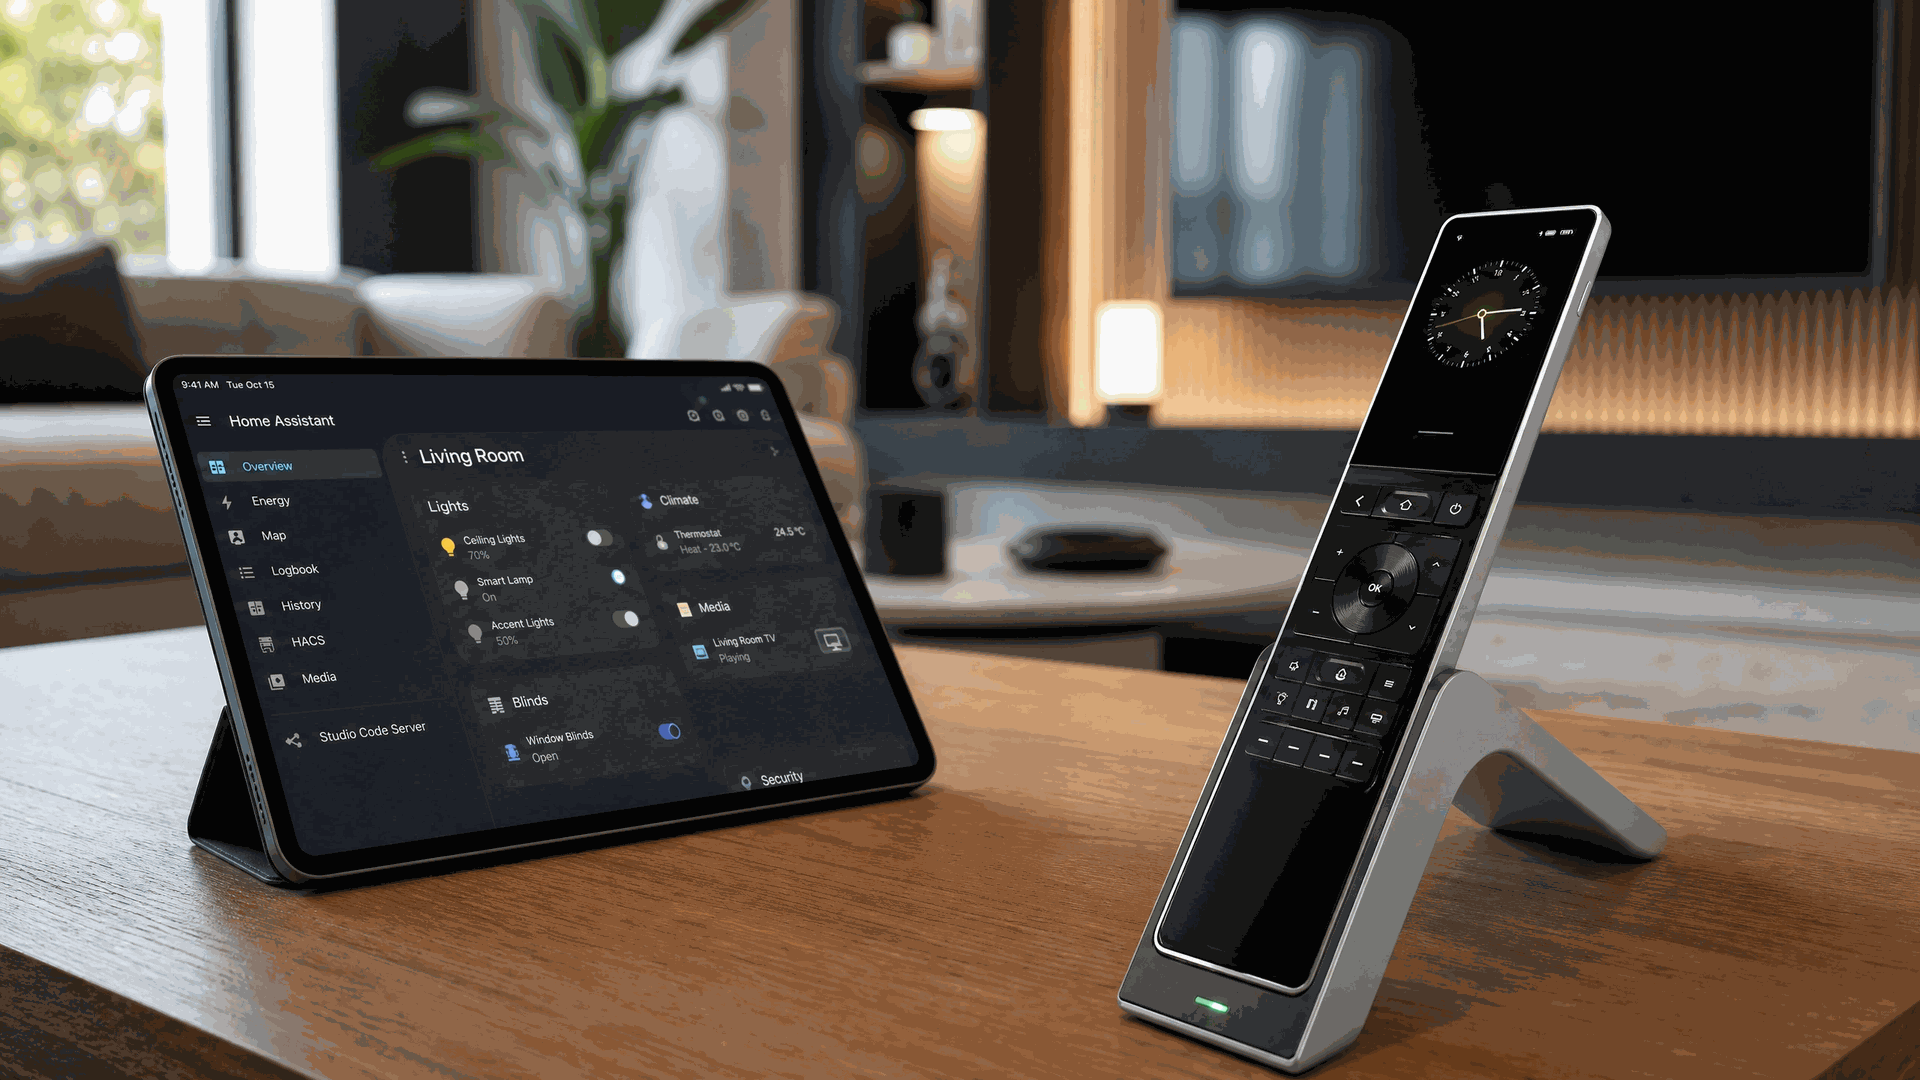
How It Works — The Astrion Launcher
Your Astrion Remote comes with a dedicated Launcher designed specifically for Home Assistant control. Unlike a generic Android launcher, the Astrion Launcher is optimized for one purpose: efficient smart home control through a 3.1-inch touchscreen and physical buttons.
Wi-Fi Status
Connected
Visible in the top-left of the pull-down menu
Home Assistant Status
Connected
Visible in the top-right of the pull-down menu
One-time setup, lifelong benefit: After you connect to Wi-Fi and log in to Home Assistant via the QR code method below, your remote will automatically maintain the connection. The Launcher's pull-down menu lets you check connection status at a glance.
Prerequisites
Before you begin, make sure you have the following:
- Home Assistant running (Core 2023.1 or newer)
- HACS (Home Assistant Community Store) installed
- Astrion Remote powered on and connected to Wi-Fi
- Both devices on the same local network
📌 Important: Astrion Remote is a control terminal, not a device to be integrated. It will not appear in your Home Assistant integrations list — it communicates via the WebSocket API.
Step-by-Step Pairing Guide
0 Get to Know the Astrion Launcher
Before you pair, it helps to understand the interface you'll be using:
- Pull-down menu: Swipe down from the top of the screen to access system settings, Wi-Fi status (top-left), and Home Assistant connection status (top-right)
- Home Screen: Your RosCard dashboards will appear here after pairing
- Refresh: Pull down from the top and tap the refresh button to sync new RosCard views
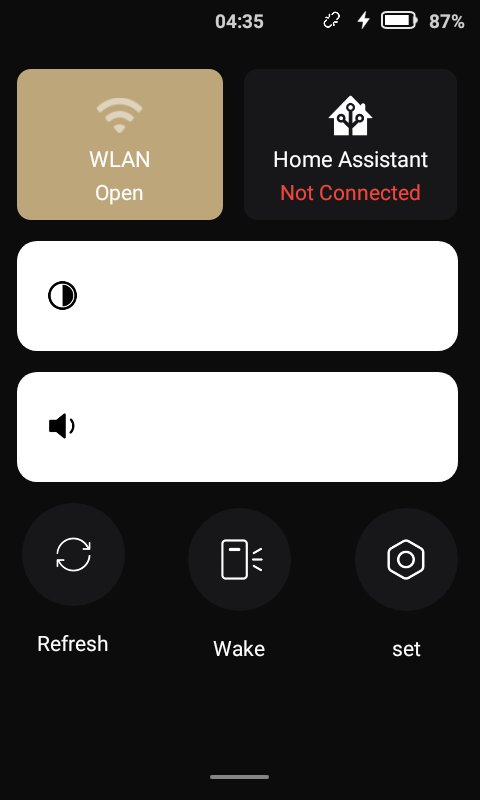
💡 Tip: The Launcher is designed to be simple and focused. Everything you need is either on the home screen or one swipe away.
1 Install RosCard via HACS
RosCard is required. The Astrion Remote can only read and display data that has been configured through RosCard. Without RosCard, your remote will connect to Home Assistant but show no controls.
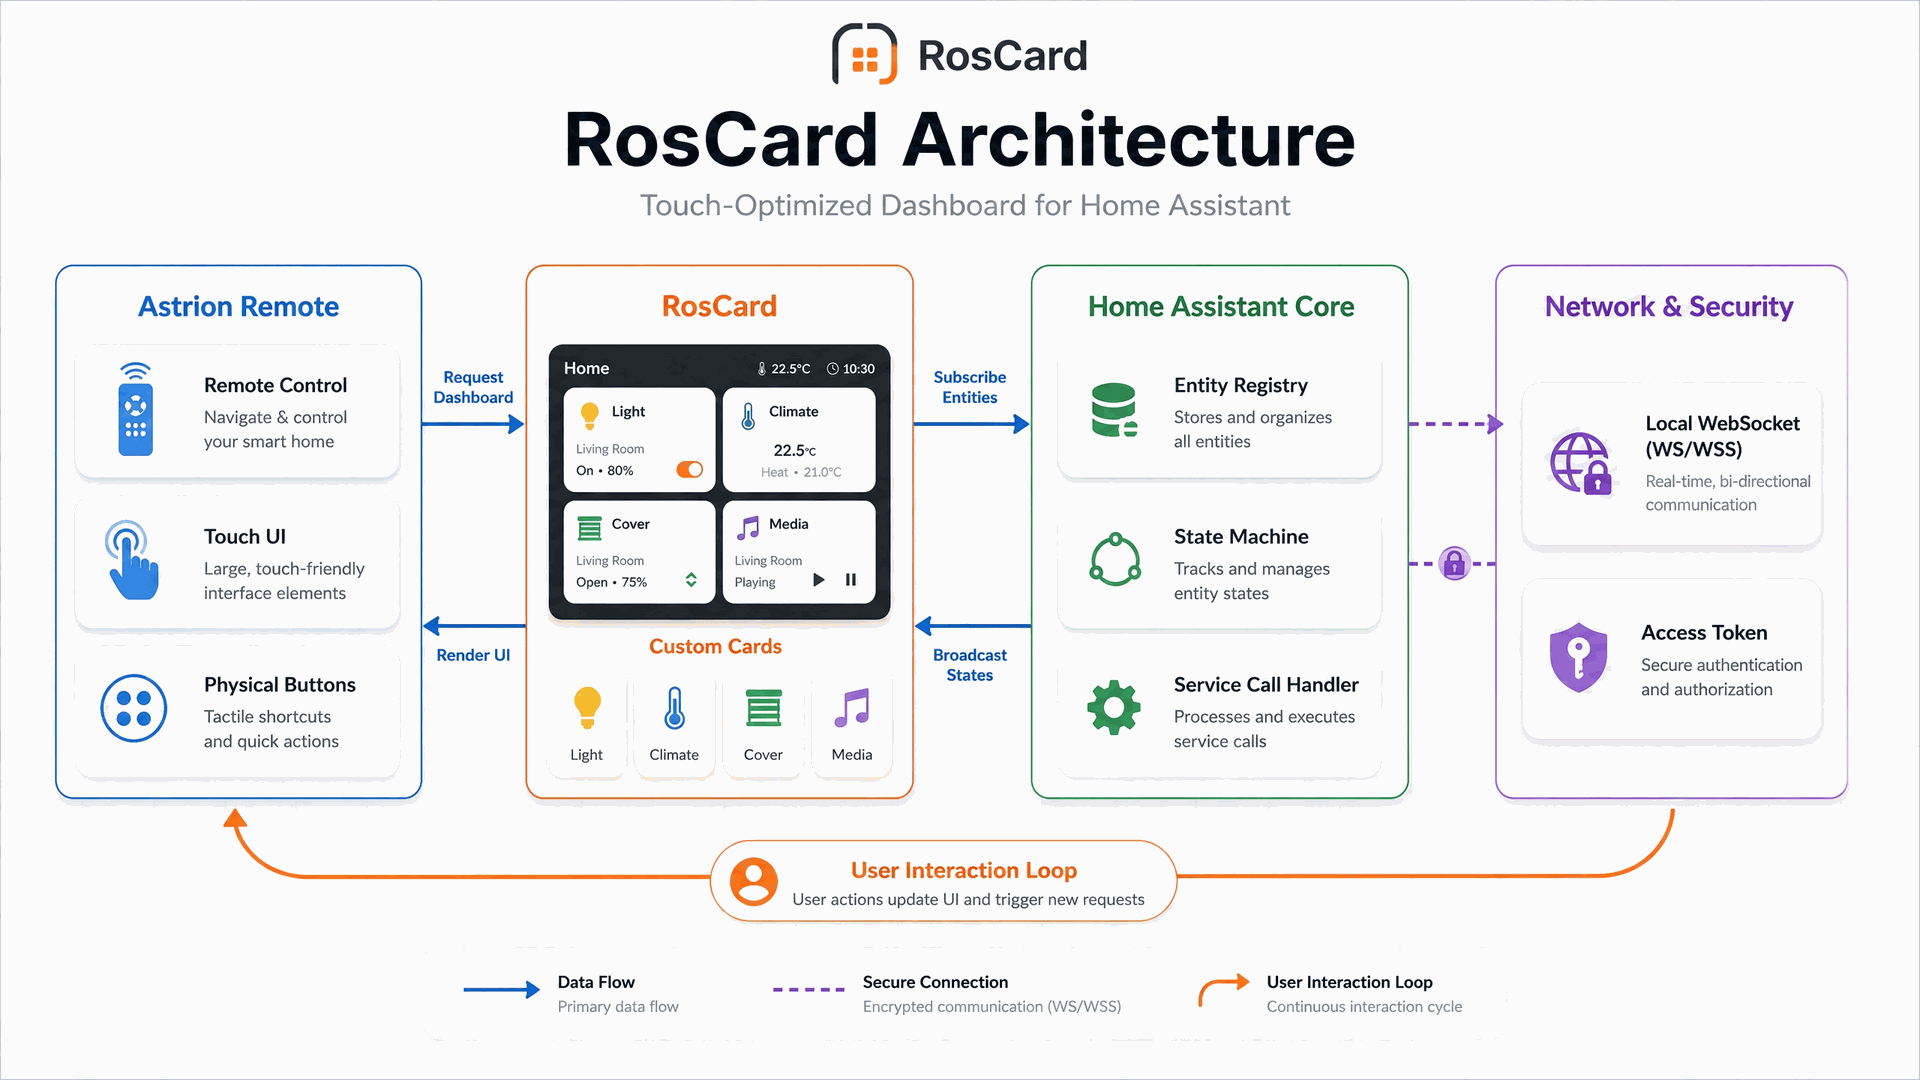
- Open Home Assistant → HACS → click ⋮ (menu) → Custom repositories
- Add: Repository URL:
https://github.com/yyqclhy/RosCard&|& Category:Dashboard - Refresh HACS (press F5), search for RosCard, click Download
- Restart Home Assistant if prompted
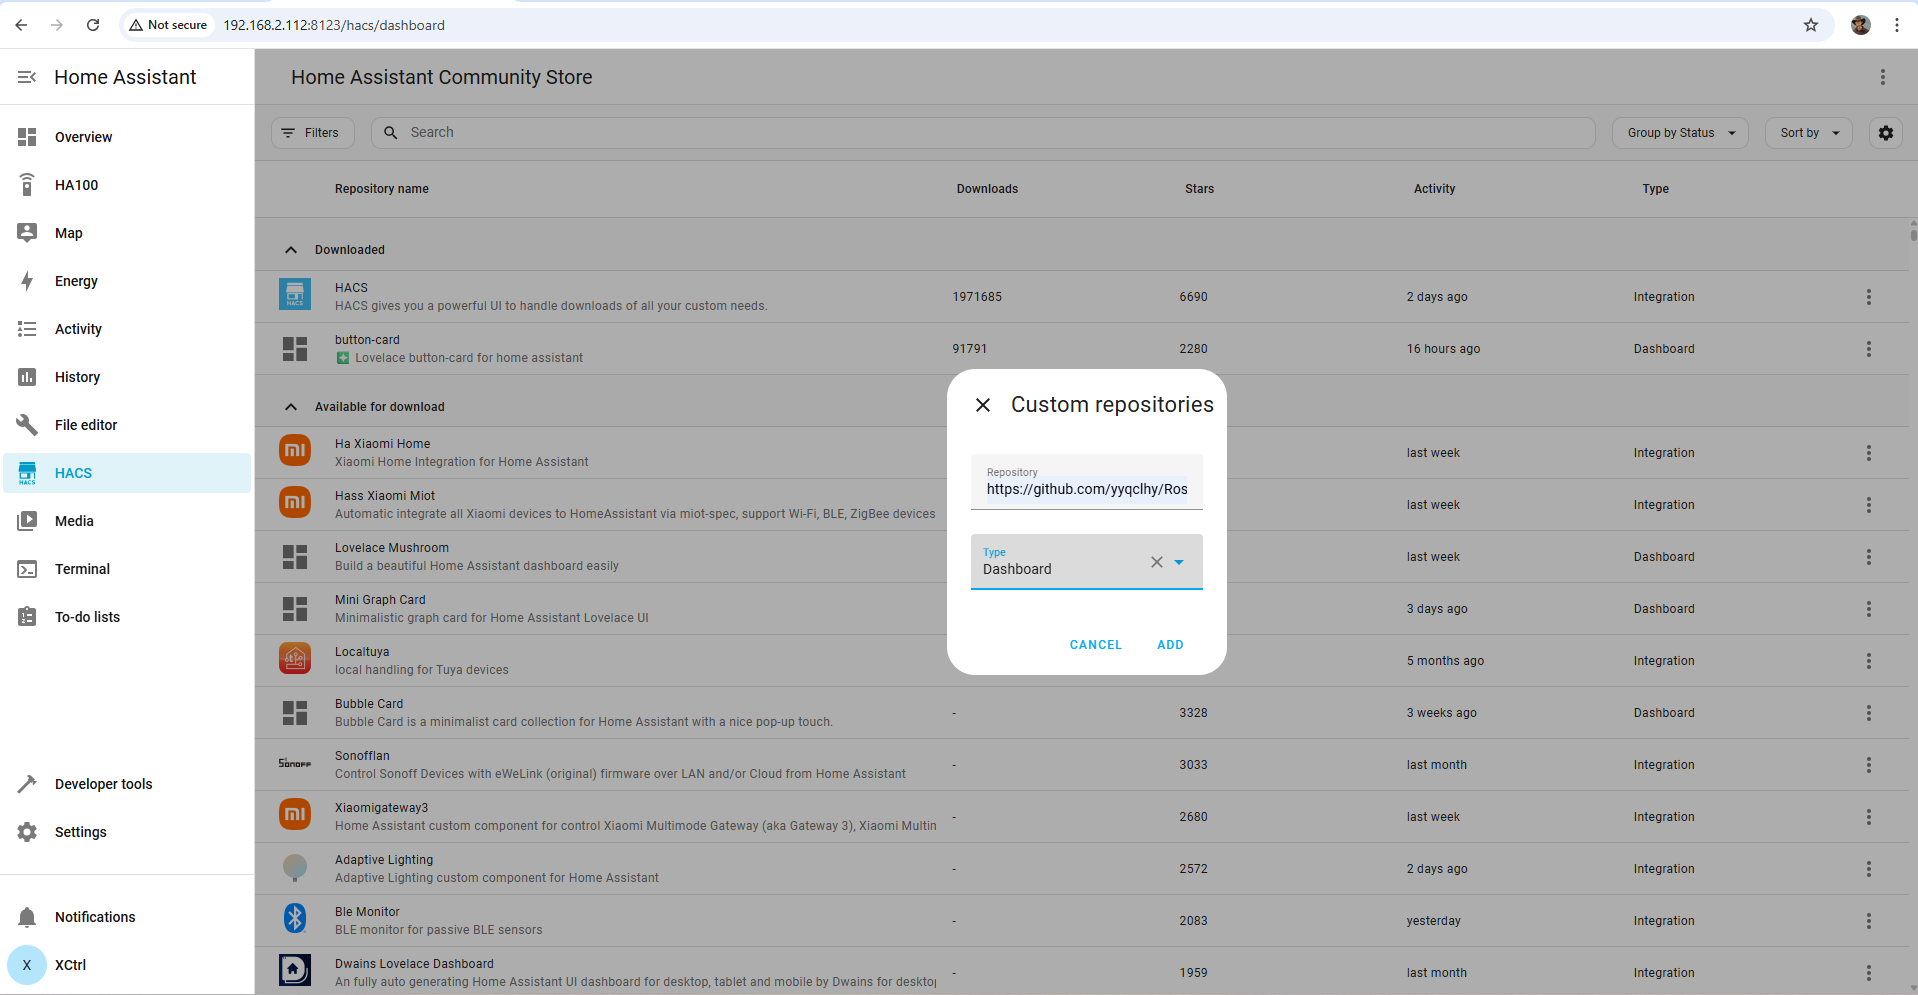
⚠️ Important: RosCard is the only way for your Astrion Remote to receive control data. Home Assistant dashboards without RosCard cards will not be visible on the remote.
🔑 Key Point: Installing RosCard is only half the setup. You must also add your devices to the corresponding RosCard cards (e.g., Light Card, Climate Card, Media Card, TV Card, Scene Card) and configure their functions (bind entities, set display names, enable "Display Independently" for full‑screen access). Only data from properly configured RosCard cards can be read by the remote.
2 Create a Long-Lived Access Token
In Home Assistant, you need to generate a token that allows the Astrion Remote to authenticate with your server.
- Click your profile icon (bottom-left corner)
- Scroll to Security & Privacy
- Click Long-Lived Access Tokens → Create Token
- Name it "Astrion Remote" and click Create
- Copy the token immediately — you won't be able to see it again
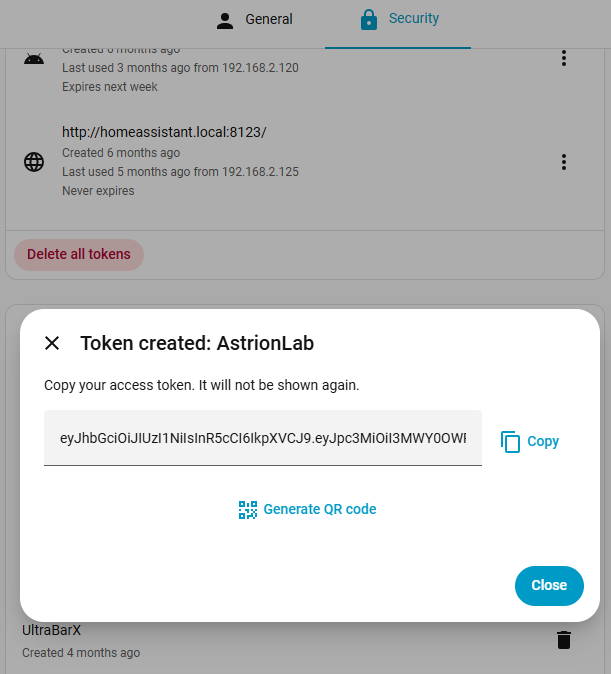
🔒 Security: Keep your access token secure. If compromised, revoke it from the same Security settings page.
3 Generate a QR Code
Create a QR code containing your Home Assistant URL and the access token. This is the recommended method for pairing.
Example:
Use any QR code generator tool (online, HA add-on, or command line) to convert this URL into a QR code.
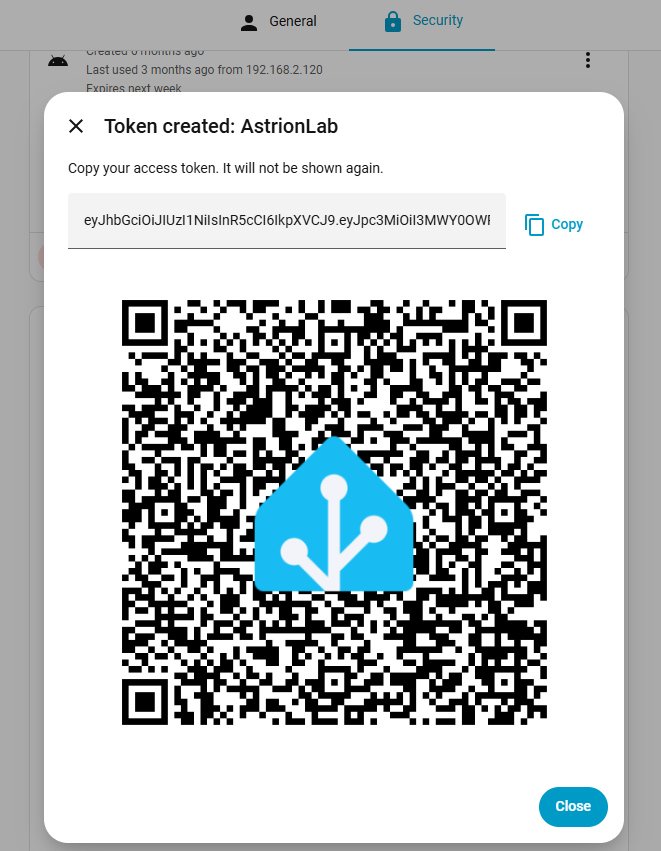
4 Scan QR Code on Astrion Remote
On your Astrion Remote, navigate to the Home Assistant login screen and scan the QR code.
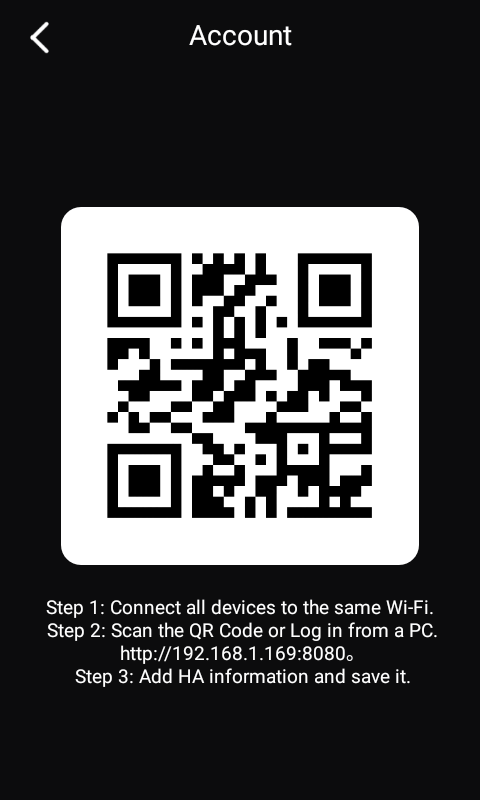
- Open Settings on your remote
- Select Home Assistant → Login
- Scan QR Code
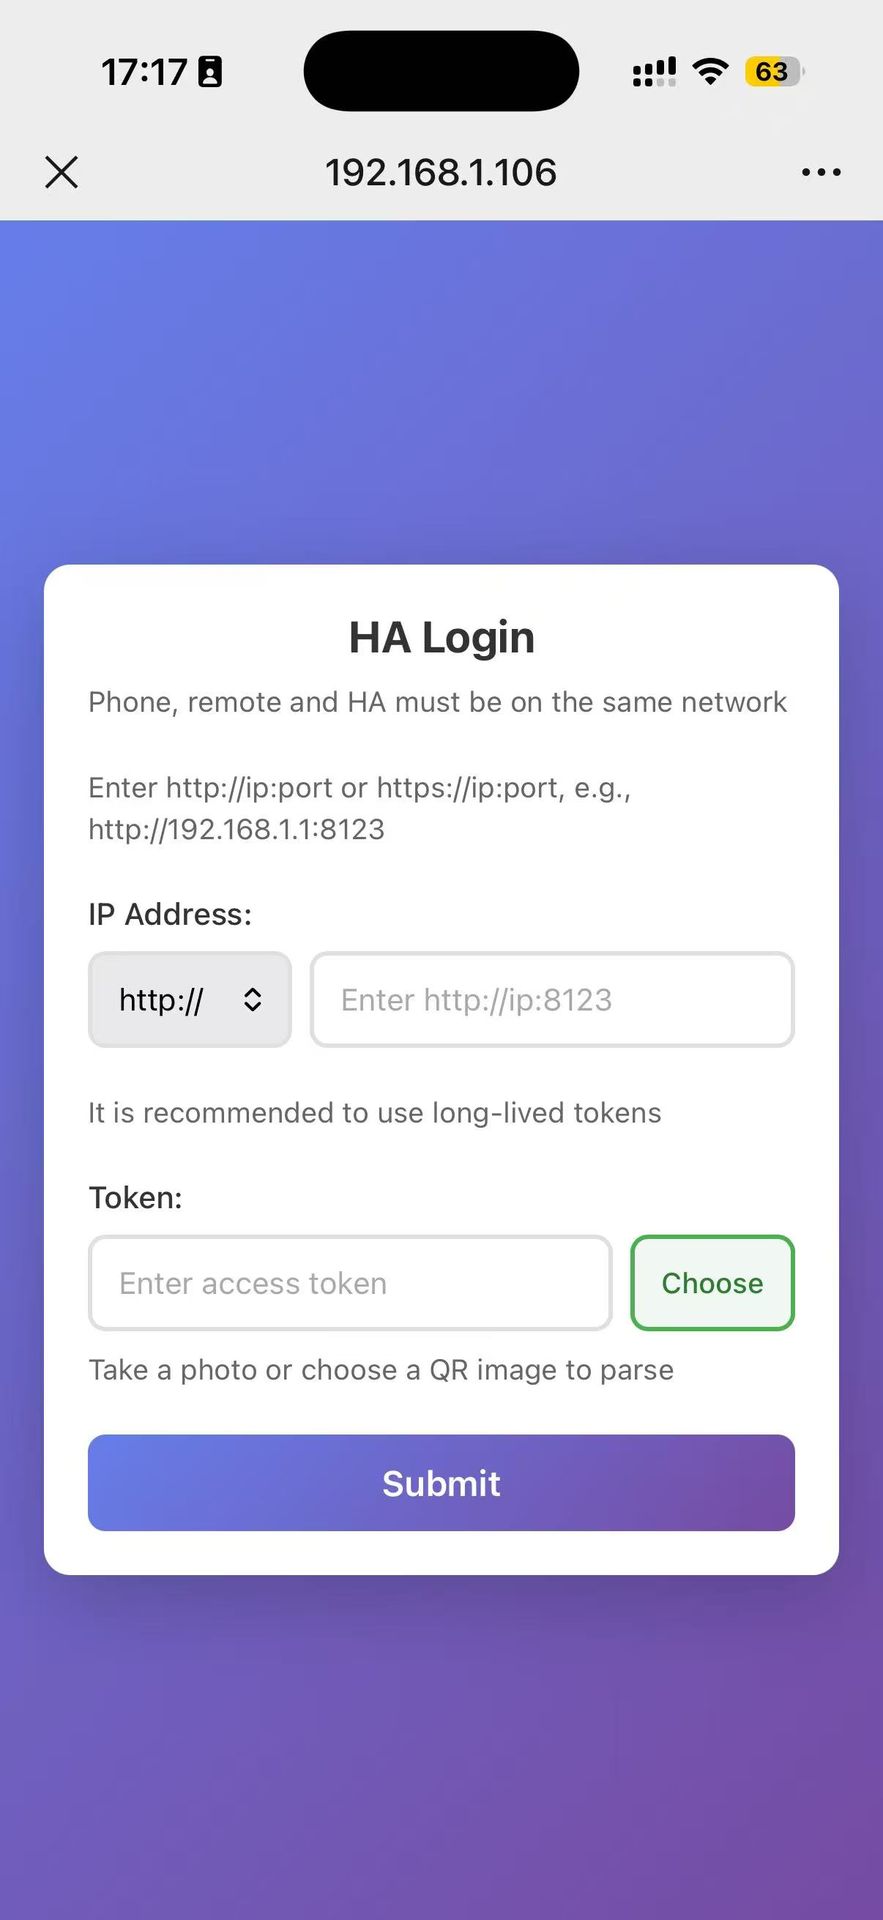
- Using a smart phone to scan the QR code to be redirected to the web-based IP and Token login page. Enter your Home Assistant server IP address and the saved long-term token, then submit to accomplish login.
5 Verify Connection
Wait for the connection confirmation. If successful, your Astrion Remote will automatically load your RosCard views.
- You should see your RosCard dashboards appear on the remote
- If views don't appear immediately, pull down from the top of the screen and tap the Refresh button
✅ Success! Your Astrion Remote is now paired with Home Assistant. You can start controlling your smart home devices.
After Pairing — Why Don't I See Anything?
This is the most common question from new users. If you've paired successfully but your remote shows a blank screen or no controls, the issue is almost always RosCard configuration — not the pairing itself.
RosCard is the Only Data Source
Your Astrion Remote only reads data that has been configured through RosCard. Installing RosCard alone isn't enough — you must also:
- Add devices to the corresponding RosCard cards (e.g., add your lights to a Light Card)
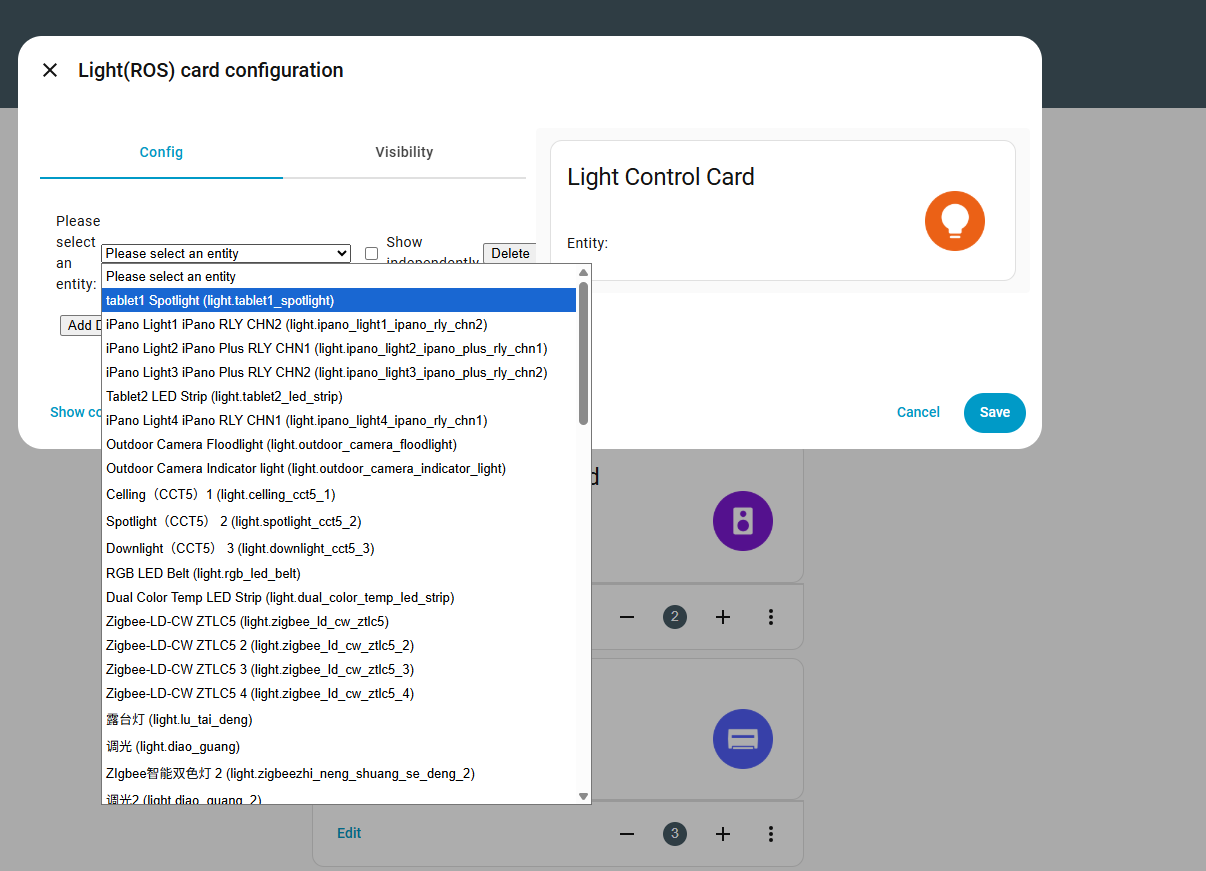
- Bind the correct entities to each card (select your
light.living_roomentity, etc.) - Configure the card's functions (set display names, enable "Display Independently" for full‑screen access)
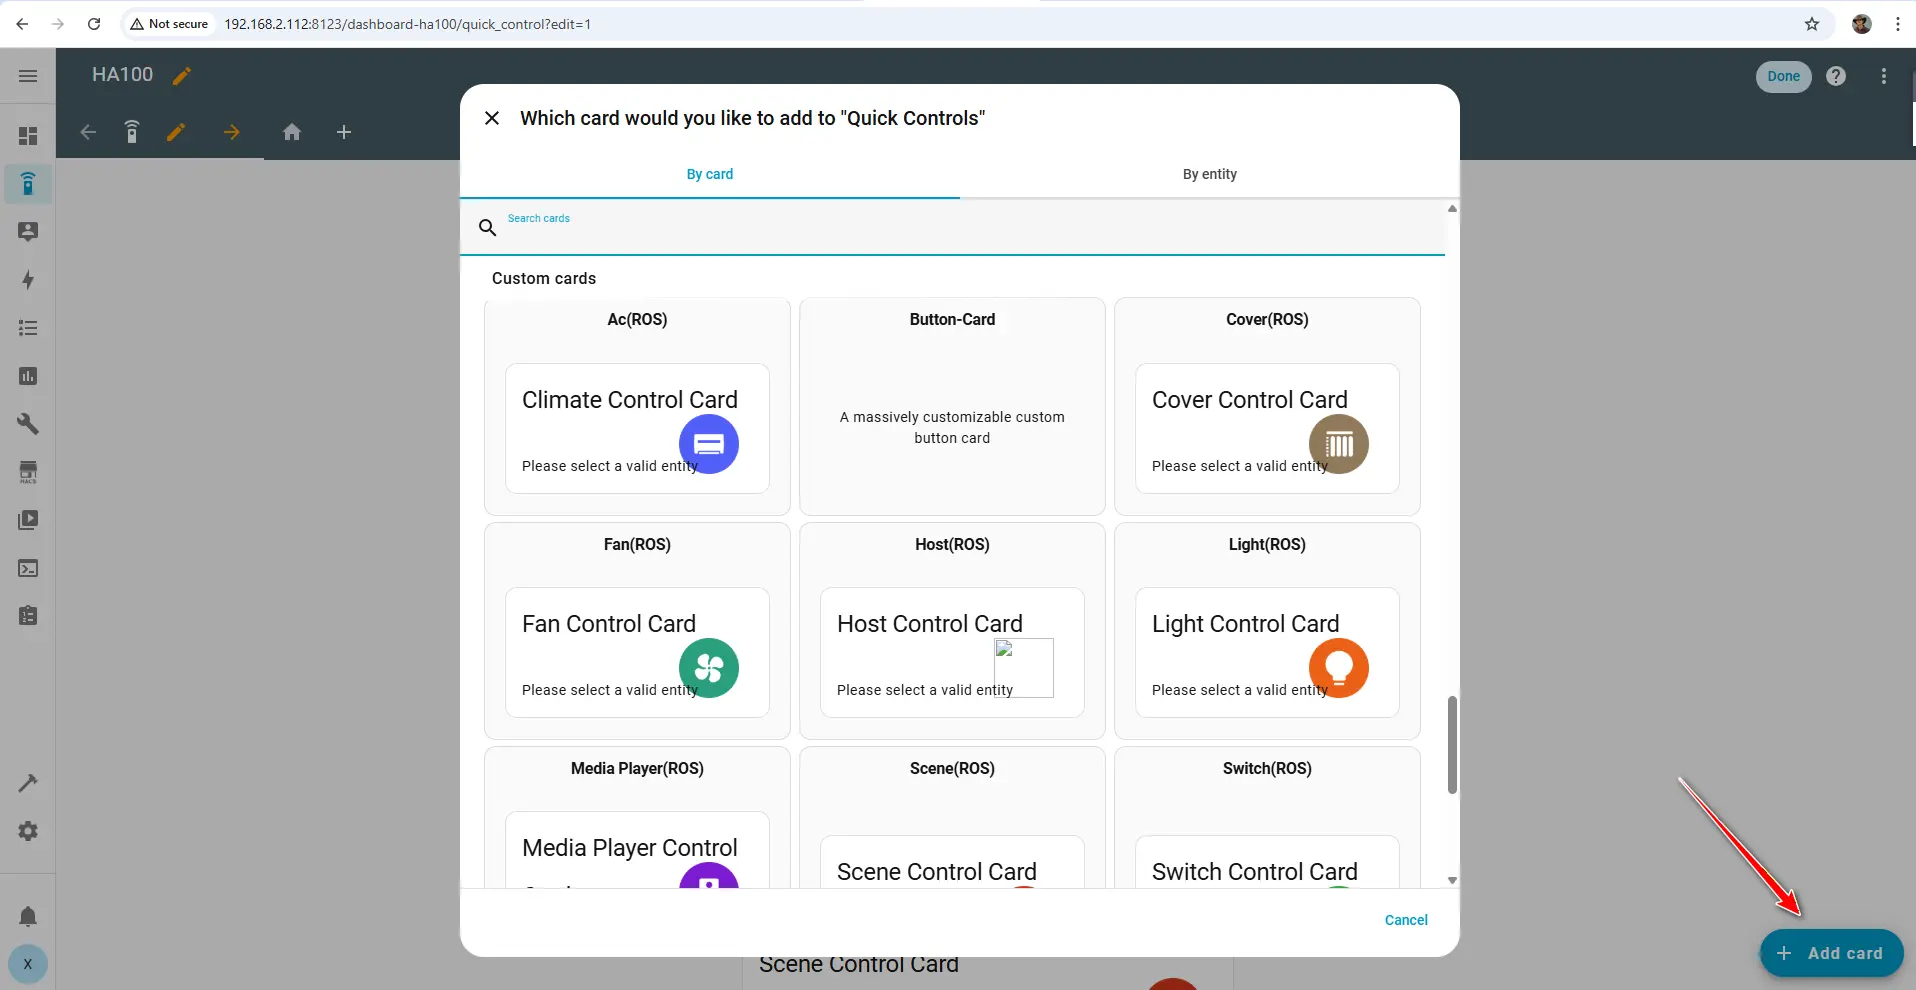
The remote does not directly download standard Home Assistant Lovelace cards — only RosCard cards that have been properly configured will appear on the remote.
- What works: Dashboards and views that contain at least one properly configured RosCard card
- What doesn't work: Any view that only contains standard Lovelace cards (entities card, glance card, etc.)
How to Fix "No Data" Issues
1 Add Devices to RosCard Cards
For each device you want to control (lights, climate, media, etc.), add the corresponding RosCard card to your dashboard and bind the correct entity.
2 Configure Each Card
Set display names, enable "Display Independently" for quick‑access full‑screen pages, and configure any additional card‑specific settings.
3 Refresh the Remote
After adding and configuring RosCard cards, you must sync them to the remote. Pull down from the top of the home screen and tap the Refresh button (circular arrow icon).
Why this matters: The remote caches its data. Without a refresh, newly added RosCard cards won't appear even if they exist in HA.
4 Check View and Dashboard Names
The Astrion Launcher has known issues with certain reserved names. Avoid using the following names for your views or dashboards:
default— conflicts with the system default viewhome— conflicts with the home screen
If you're using these names, rename your view/dashboard to something unique (e.g., "Living Room", "Main Control", "Astrion Dashboard").
⚠️ Still not working? If you've added RosCard cards, refreshed, and renamed your views but still see nothing, check the troubleshooting section below or visit the community forum.
Video Tutorial: RosCard Configuration
Watch this step-by-step tutorial to see the complete RosCard setup process in action — from installing RosCard via HACS to building your first dashboard on the Astrion Remote.
💡 Tip: This tutorial covers the entire RosCard workflow — from installation to custom card configuration. It's a great companion to the written guide above.
What Others Are Saying
See the Astrion Remote in action through the eyes of a Home Assistant user and reviewer. This hands-on review covers the unboxing, setup, voice control, and daily usage experience.
⭐ Community Insight: "A smart remote built specifically for Home Assistant — including voice control!" This review highlights the Astrion Remote's unique value proposition and real-world usability.
Troubleshooting
QR Code Scan Fails
- Ensure the QR code contains the full URL with the token
- Check that the token hasn't been revoked
- Try using a different QR generator tool
- Try the manual login method as an alternative
Remote Shows "No Connection"
- Verify both devices are on the same Wi-Fi network
- Check that your Home Assistant server is running
- Ensure the HA URL is correct — use the local IP address
- Try restarting the remote and your HA server
Automatic Discovery Fails
- Enter the HA URL manually:
http://YOUR_HA_IP:8123 - Make sure network discovery is enabled in Home Assistant
- Check that your router supports mDNS (Bonjour)
RosCard Views Not Loading
- Pull down from the top of the home screen and tap Refresh — this is the most common fix
- Verify that RosCard is installed in HACS
- Check that you have at least one RosCard card added to your dashboard
- Rename your view — avoid "default" or "home" as view names
- Try restarting the remote
Token Expired or Revoked
- Revoke the old token from Home Assistant
- Create a new Long-Lived Access Token
- Regenerate the QR code with the new token
- Re-scan or re-enter the credentials on the remote
🔒 Security Reminder: If you lose your remote, immediately revoke its access token from Home Assistant to prevent unauthorized access to your smart home.
Setup Complete! 🎉
Congratulations! Your Astrion Remote is now fully set up and paired with Home Assistant. You can now start exploring your RosCard dashboards and controlling your smart home devices.
Where to go from here
- Add devices to RosCard cards: For each device (lights, climate, media, etc.), add a corresponding RosCard card and bind the correct entity
- Configure each card: Set display names, enable "Display Independently" for quick access
- Refresh the remote: After configuring cards, pull down from the top of the home screen and tap Refresh to sync
- Explore more RosCard features: Customize your dashboards with Light Cards, Climate Cards, and more
- Configure shortcuts: Map physical buttons to your favorite devices and scenes
- Join the community: Share your setup and get tips from other Astrion users
Related resources
Need help pairing?
Our support team and community are here to assist you.