Infrared Control Guide
Set up infrared (IR) control on your Astrion Remote. Control TVs, set-top boxes, and other IR devices directly from the TV Card using the Astrion Home Integration.
Overview
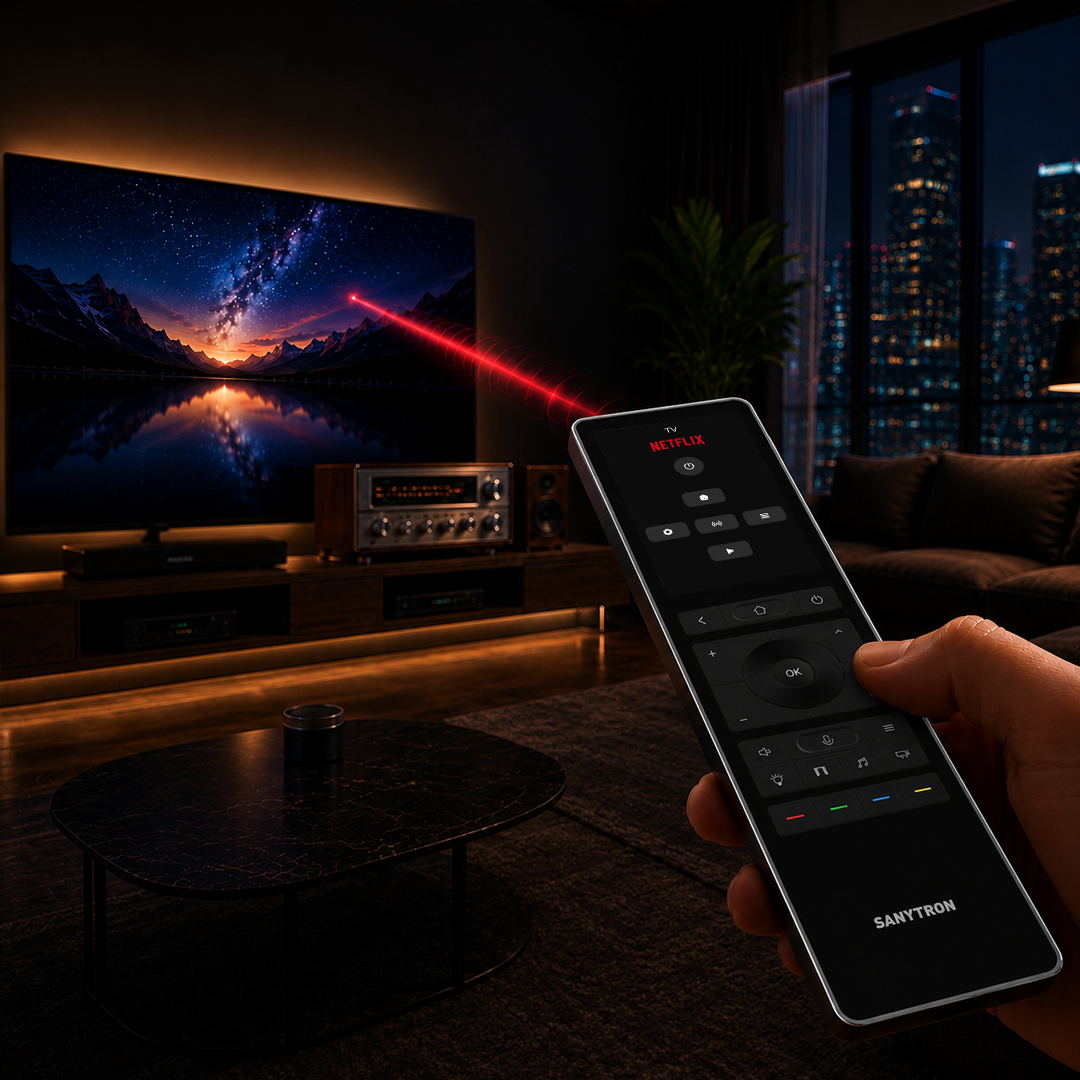
Starting with firmware V1.2.0, the Astrion Remote supports local infrared (IR) control through the built-in IR transmitter. This allows you to control TVs, set-top boxes, audio equipment, and other IR-enabled devices directly from your Astrion Remote — even without a network connection.
The IR feature is accessed through the TV Card, which can be bound to Astrion IR entities, Harmony HUB entities, or media player entities. For devices not in the built-in IR database, you can also add custom IR codes using a simple format.
💡 Tip: IR control requires the Astrion Home Integration to be installed in Home Assistant. This integration bridges your Astrion Remote's IR transmitter with your TV Card configuration.
IR Development History — From Community Request to V1.2.0
The journey to IR support on Astrion Remote was driven by community feedback. Here's the story of how a user request became a core feature.
Community Calls for IR & BT Support
User Mathias_belevid highlights the need for IR and Bluetooth support on the Astrion Remote.
User: Mathias_belevid · Topic: #72 · IR/BT Support Request
Official Commitment: IR Support is Coming
After community discussion and internal planning, the Sanytron team commits to delivering IR functionality within 1-2 months.
Tim_Chan (Dev Engineer) · Topic: #72 · IR Development Commitment
HA100 as UI Terminal, HA200 as Universal Controller
Sanytron clarifies product strategy: HA100 is the premium UI terminal for HA ecosystem, while HA200 will deliver full universal remote capabilities including Bluetooth HID and a dedicated hub.
Sanytron Team · Topic: #72 · Product Strategy Communication
Infrared Research Shows Promising Results
Early testing results on set-top boxes demonstrate stable and reliable IR control performance. IR is formally incorporated into the Astrion development roadmap.
Charles · Topic: #179 · IR Research Update
V1.2.0 — IR Control Goes Live!
Local IR control is officially released with firmware V1.2.0. Includes TV Card support for Astrion IR entities, Harmony HUB entities, and custom IR codes. Astrion Home Integration launched in parallel.
✅ The most requested feature is now available!
Community Responds — Next Steps Identified
Following the release, users provided feedback on OTA update issues and integration installation. The team is actively addressing these to improve the experience.
Chykan_Hunter · Topic: #72 · Feature Enhancement Suggestion
✅ Community-Driven Development: IR control on Astrion Remote is a testament to the power of community feedback. From the initial user request in January 2026 to the V1.2.0 release in June, the journey showcases how Sanytron listens, responds, and delivers.
Key Configuration Concepts
Before diving into the setup, it's helpful to understand some of the key interface elements and configuration options available on your Astrion Remote.
Remote Version & Device Type
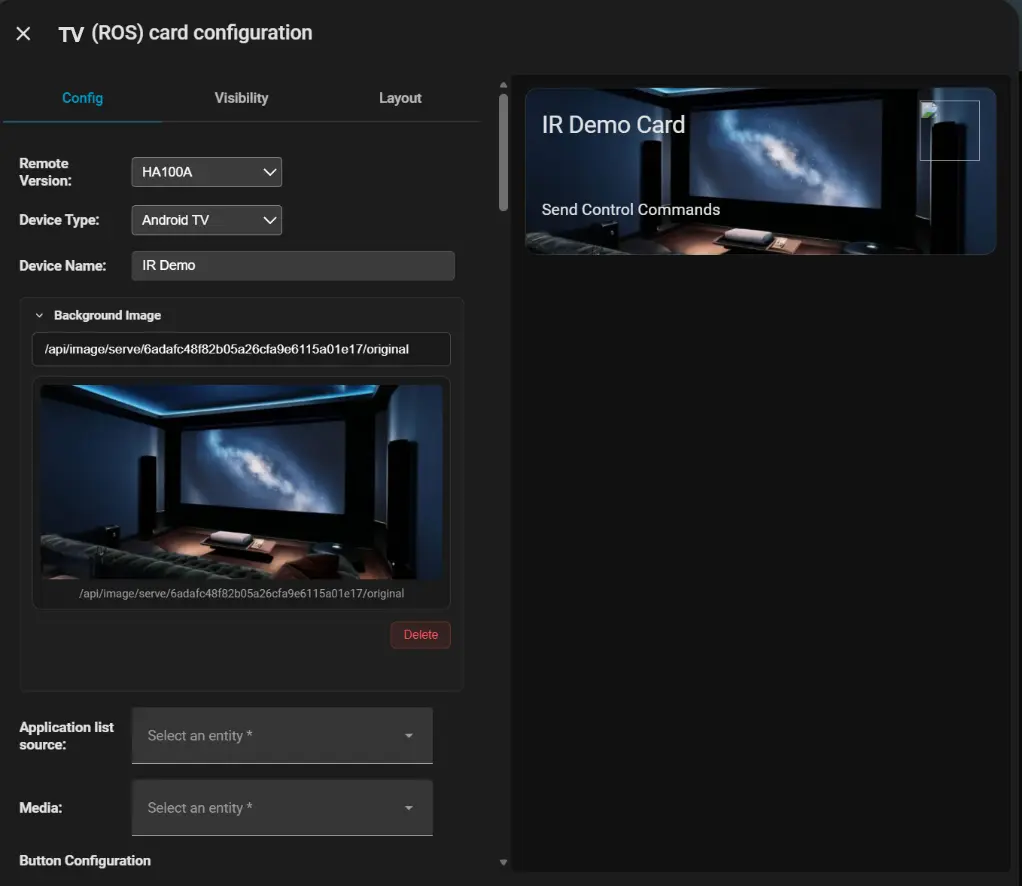
You can check your remote's firmware version and hardware revision by navigating to Settings → About. This screen also displays the physical button template for your remote model.
Device Type: The UI of the remote differs slightly between Android and iOS. The Android version includes a numeric keypad and uses a different logo. The iOS version has a cleaner layout without the dedicated number keys.
Device Name & Background Image
Device Name: You can set a custom name for your remote to identify it easily in Home Assistant and the Astrion Home Integration.
Background Image: The card list background can be customized with your own image, giving your remote a personalized look.
Application List Source
The Application List automatically displays all downloaded apps on your remote, allowing you to switch between them with a single tap. This list is populated from the apps installed on your device.
Media Integration — TV & Media Pages
Starting with V1.2.0, the TV Card integrates both TV and Media controls into a single card with swipe‑to‑switch functionality. Swipe left or right on the remote to toggle between the TV control page (direction pad, OK, volume, etc.) and the Media control page (play/pause, next/previous, and transport controls).
The Media page can also use the same button configurations as the TV page, giving you a unified experience across both views.
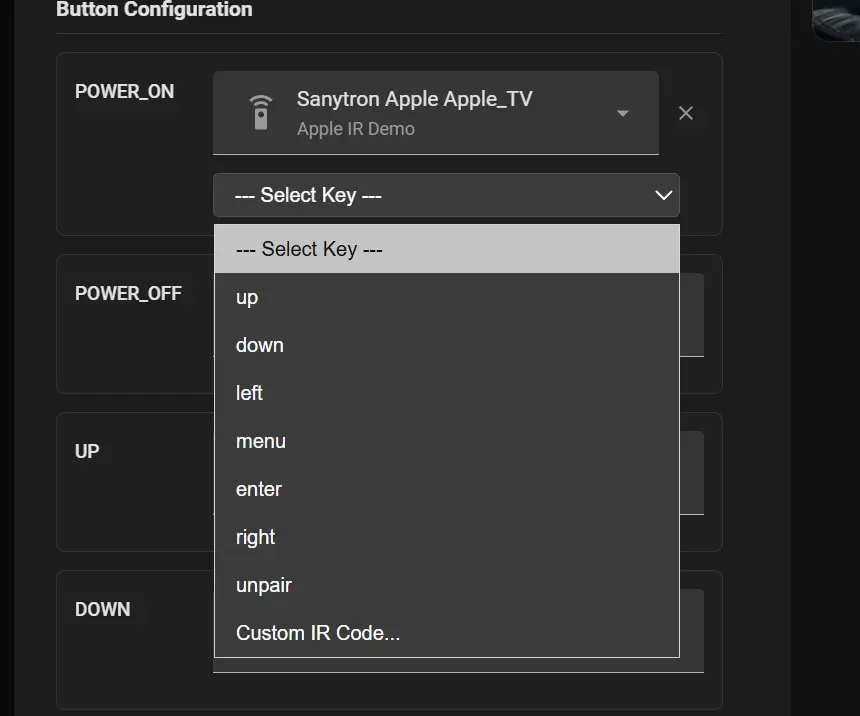
IR Button Configuration Example — POWER_ON
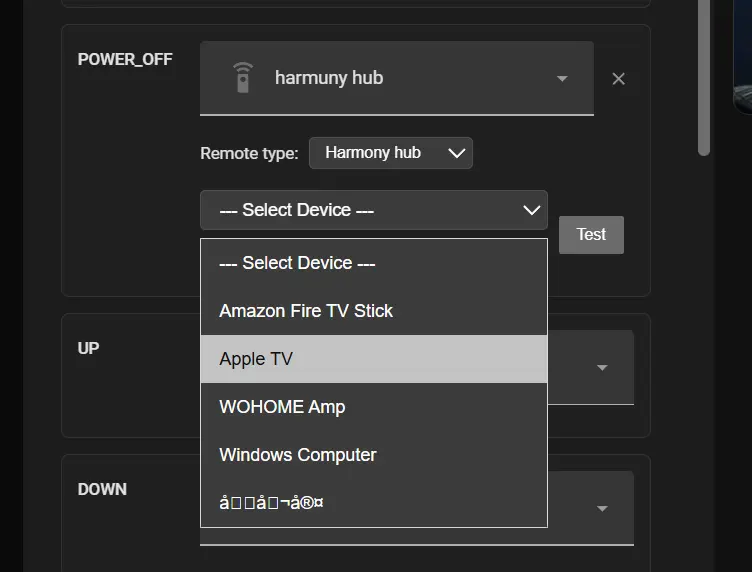
Here's a typical workflow for configuring an IR button (e.g., POWER_ON):
- In the TV Card configuration, locate the POWER_ON button mapping.
- Search for an existing IR entity that you have already configured in the Astrion Home Integration. For example, if you have an Apple TV IR profile, select it from the list.
- Choose the specific IR code value that corresponds to the POWER_ON function. (The integration provides a list of available codes for that device.)
- Click Test to send the IR signal and verify that it controls your device correctly. If it doesn't work, try a different code value or check the IR emitter placement.
Repeat this process for each button you wish to configure (e.g., VOL_UP, VOL_DOWN, INPUT, etc.).
💡 Tip: Physical buttons on the remote can be bound to automations or scripts in Home Assistant, not just IR codes. This means you can trigger complex routines with a single press — for example, a "Watch Movie" button that dims lights, closes blinds, and powers on your AV equipment.
Prerequisites
Before you begin, make sure you have the following:
- Astrion Remote firmware V1.2.0 or newer
- RosCard updated to V1.2.0 or newer
- Home Assistant running with HACS installed
- Astrion Home Integration installed via HACS
- Your Astrion Remote connected to the same Home Assistant instance
⚠️ Important: IR control requires the Astrion Home Integration. Without this integration, the IR entity will not be available in your TV Card configuration.
Step 1 — Install Astrion Home Integration
The Astrion Home Integration connects your Astrion Remote's IR transmitter to Home Assistant, making the IR entity available for binding in the TV Card.
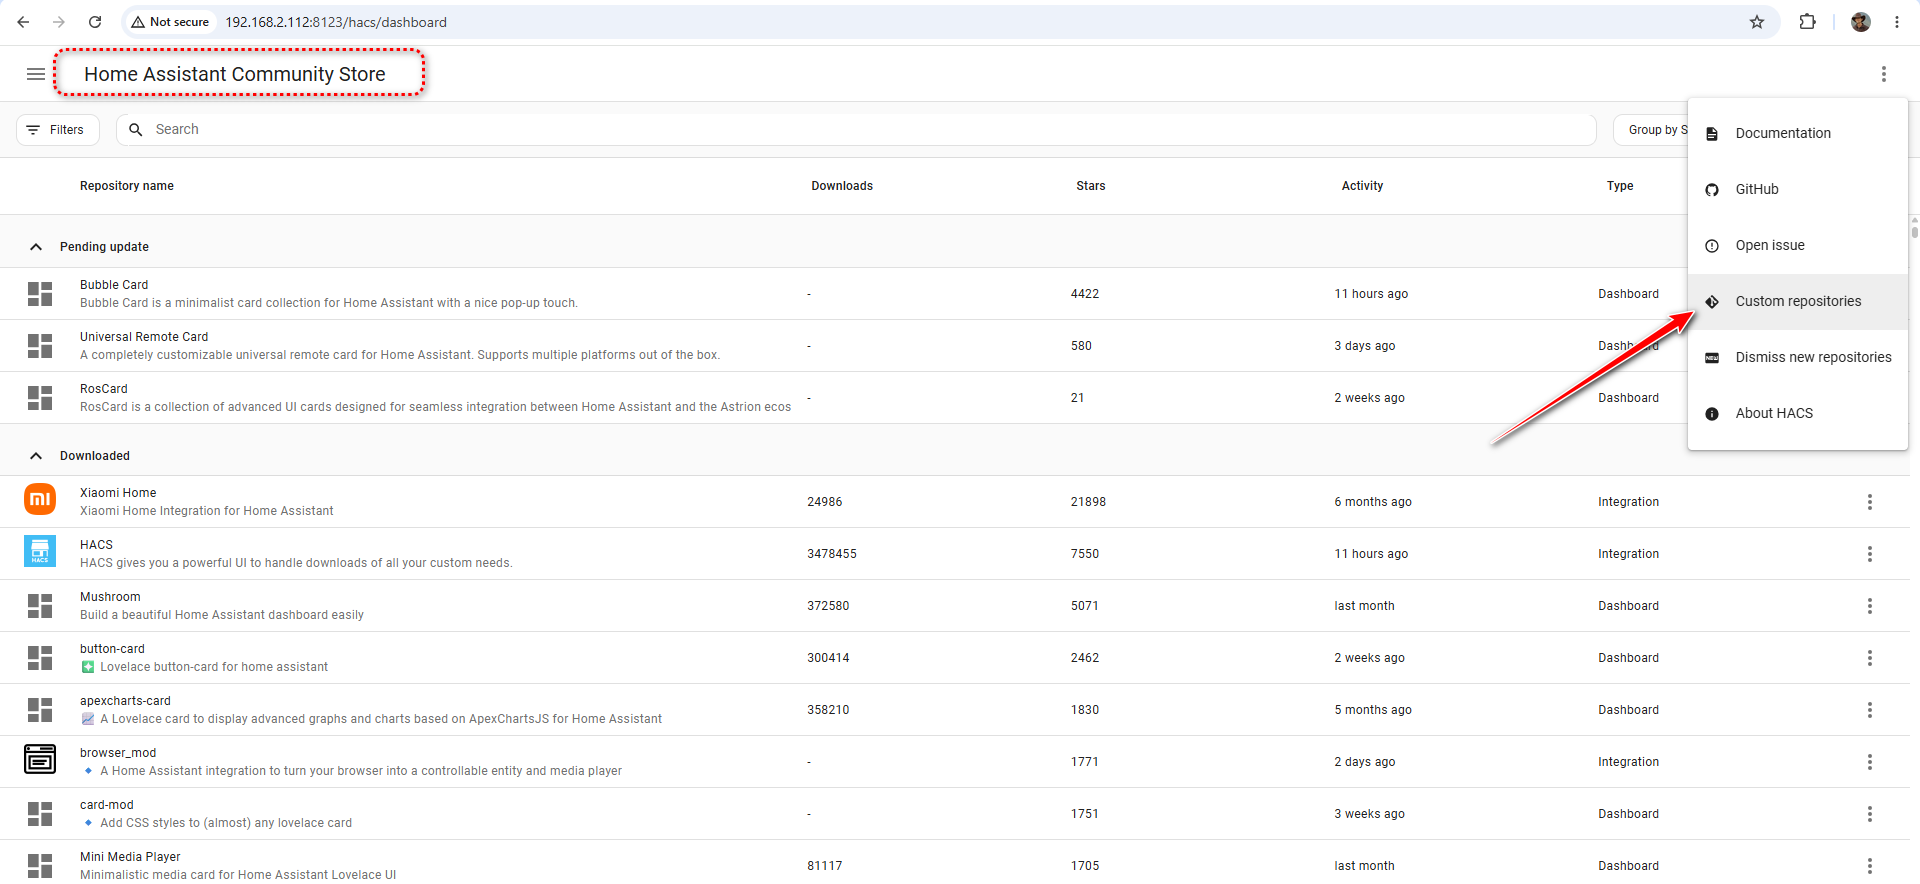
1.1 Add Repository to HACS
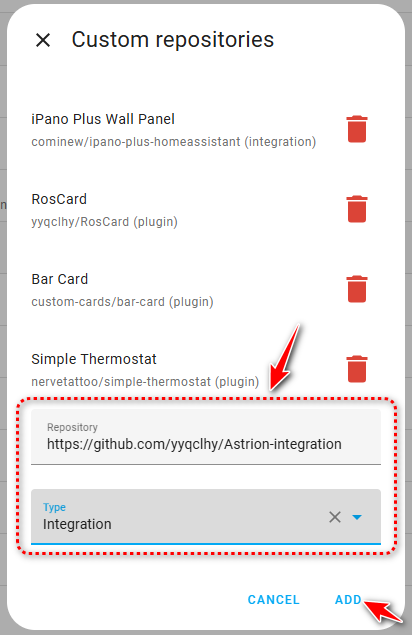
In Home Assistant, open HACS → click the menu (⋮) → Custom repositories.
- Repository URL:
https://github.com/yyqclhy/Astrion-integration - Category:
Integration
Click Add to save the repository.
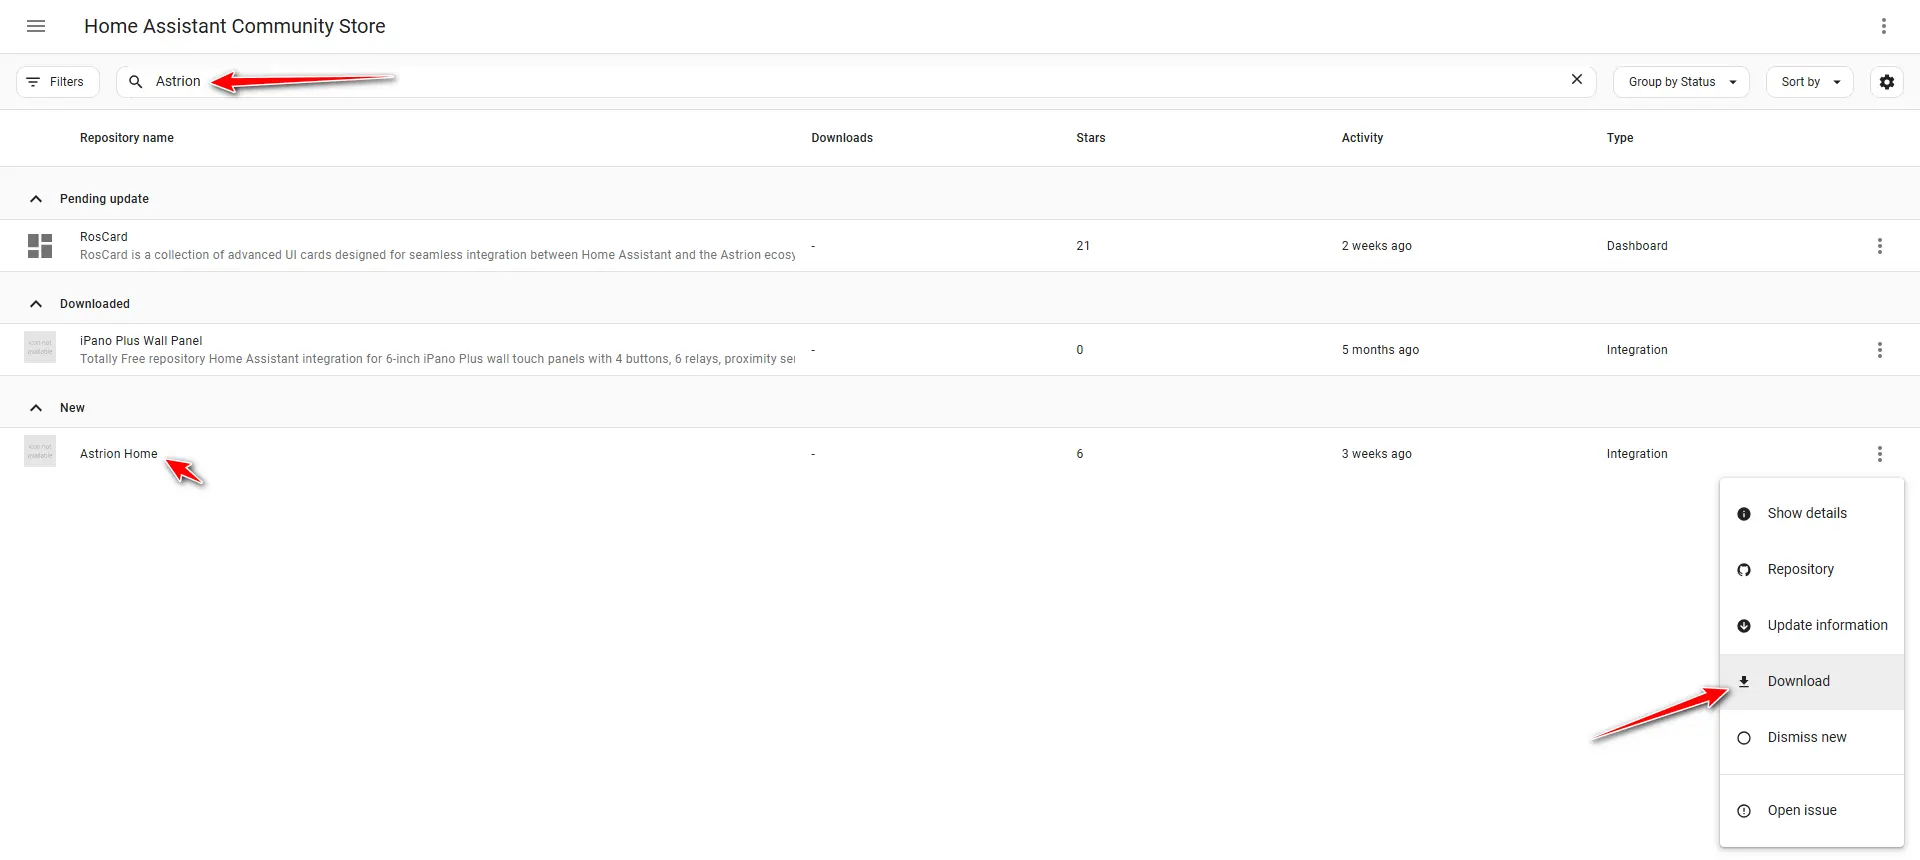
1.2 Install the Integration
In HACS, search for Astrion Home Integration, click
Download, and restart Home Assistant
when prompted.
1.3 Add the Integration
After restart, go to Settings → Devices & Services and click Add Integration. Search for Astrion and select Astrion Home.
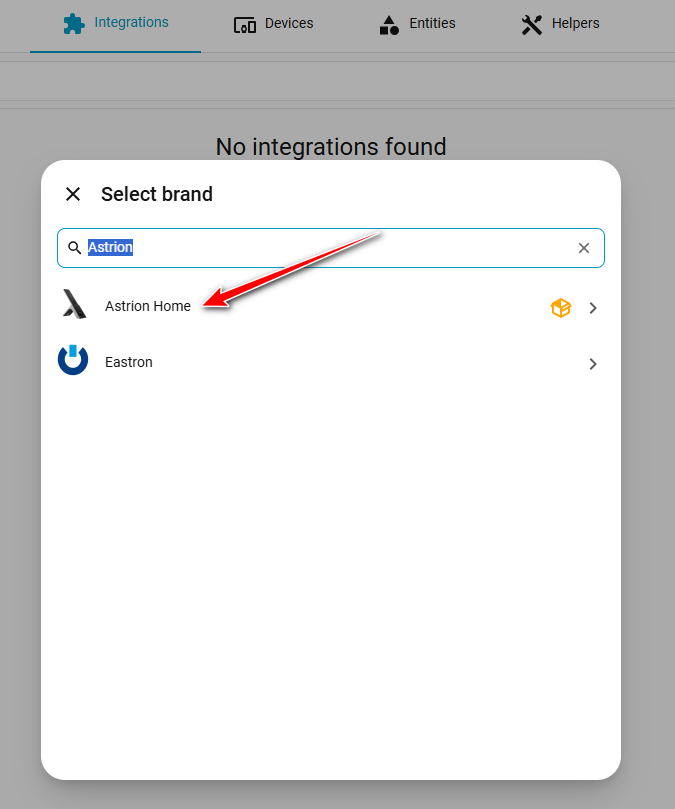
1.4 Select Your Remote Gateway
The system will search for Astrion Remote gateways connected to your
Home Assistant instance. Select your remote gateway by matching the
serial number (SN) — you can find the SN in your
Astrion Remote's About page.
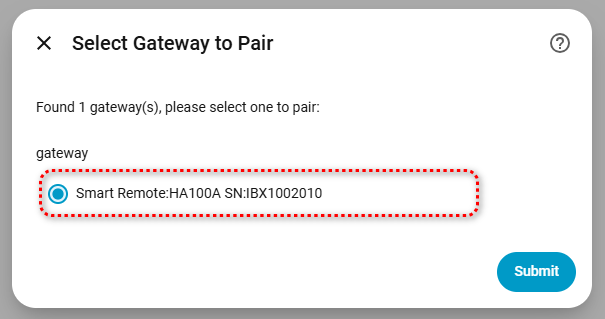
If no gateway is found, ensure your Astrion Remote is properly connected to Home Assistant.
1.5 Configure the Remote
Select the remote you want to configure and click Set up.
Follow the on-screen instructions to complete the configuration.
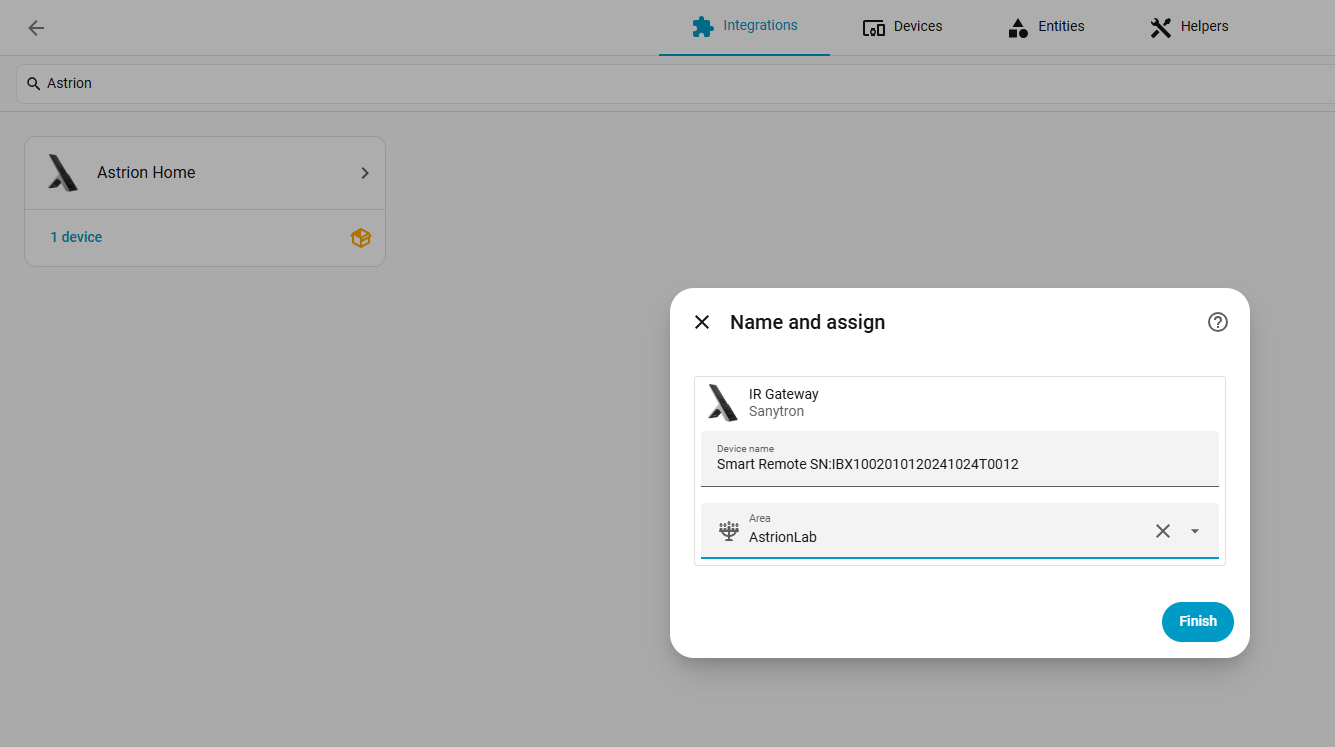
📌 Note: Currently, the IR database supports multiple device types, but only TV, Infrared fan control and media_player devices are available for addition. Additional device types will be added in future updates.
Step 2 — Bind IR Entity to TV Card
Once the Astrion Home Integration is installed, you can bind the IR entity to your TV Card for infrared control.
Binding an Astrion IR Entity
2.1 Open TV Card Configuration
In Home Assistant, open the dashboard containing your TV Card and click Edit to open the card configuration.
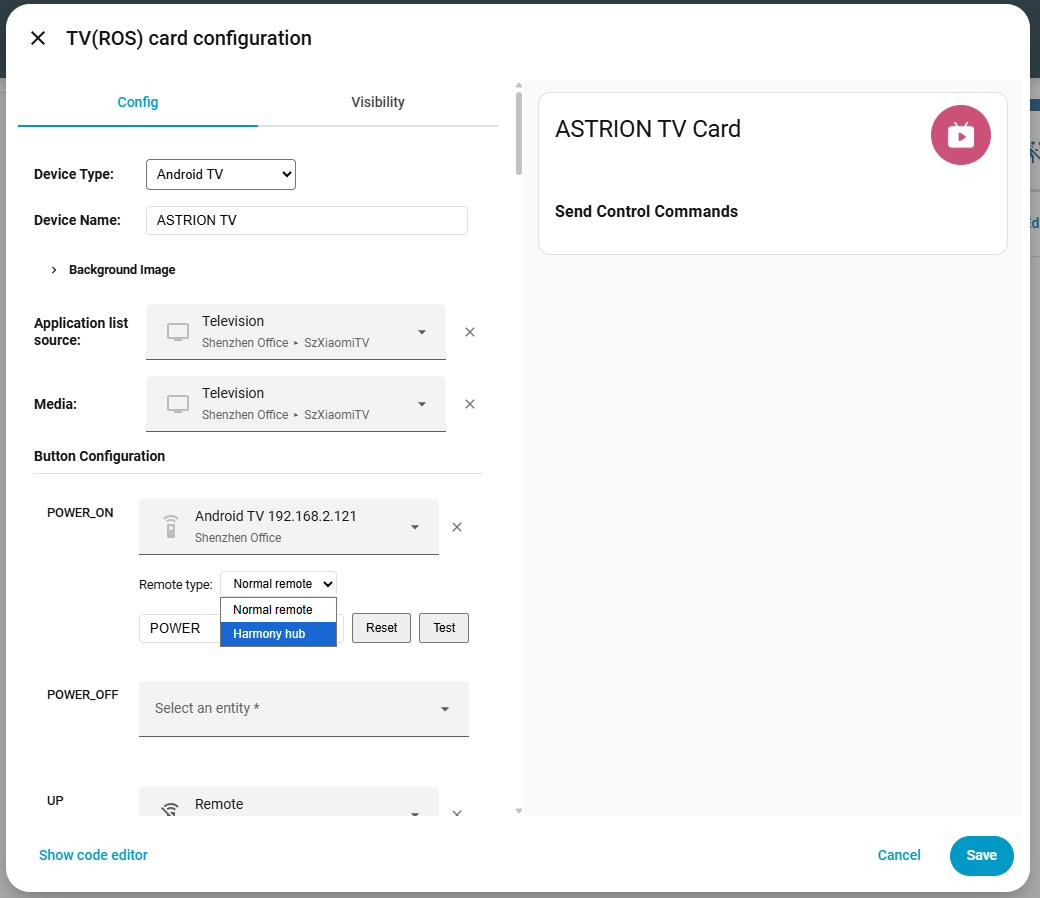
2.2 Select IR Entity
In the Button Mapping section, search for and select the Astrion IR entity provided by the Astrion Home Integration.
Choose the IR code value for the button you are configuring — for example, if you are adding an Apple TV remote, select the corresponding IR codes for each button.
2.3 Save and Refresh
After configuring all buttons, click Save to apply the changes. On your Astrion Remote, pull down from the top of the screen and tap Refresh to load the updated TV Card.
🔗 Physical Buttons & Automations: Beyond IR codes, you can bind any physical button on your Astrion Remote to a Home Assistant automation or script. This allows you to create custom actions like "Good Night" (turns off all lights, locks doors, lowers thermostat) or "Party Mode" (activates lighting scenes, starts music) — all with a single press.
Binding a Harmony HUB Entity
Starting with V1.2.0, the TV Card also supports binding to Harmony HUB entities, allowing you to control Harmony HUB devices directly from your Astrion Remote.
Prerequisites
- Your Harmony HUB must be successfully added to Home Assistant
- The Harmony HUB must be online and accessible
Configuration Steps
1 Select Remote Type
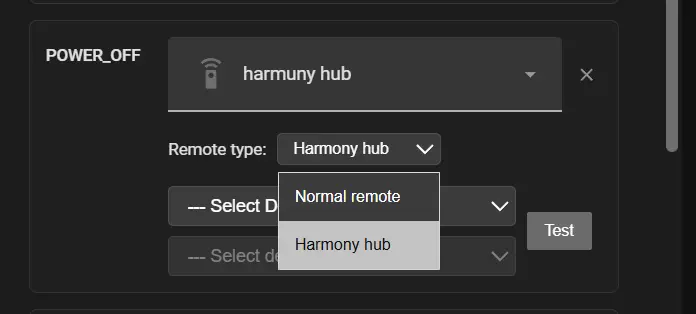
In the TV Card configuration, locate the Remote Entity field. Search for your Harmony HUB entity. In the Remote Type dropdown, select Harmony HUB — this tells the card that it's interacting with a Harmony ecosystem device.
Note: If you are binding to a different type of remote entity (e.g., a generic IR remote), select Normal Remote instead.
2 Select the Harmony Device
After selecting the Harmony HUB entity, choose the specific device you want to control from the list of devices configured in your Harmony HUB. For example, if you have an Apple TV, a TV, and a soundbar configured in Harmony, select the one you want to map buttons for.
3 Map the Button — Example: POWER_OFF
For each button on your Astrion Remote, select the corresponding Harmony command. Here's how to configure the POWER_OFF button as an example:
- In the button mapping section, find the POWER_OFF row.
- From the dropdown, select the Harmony command that corresponds to turning the
device off (e.g.,
PowerOfforOff). - Repeat this process for each button you wish to configure.
4 Test the Configuration
After mapping your buttons, click the Test button next to each configured command to verify that your Harmony HUB is sending the correct signal to your device. If the device responds as expected, the configuration is successful.
Troubleshooting Tip: If a button doesn't work, double-check that you selected the correct Harmony device and the right command name. Also ensure your Harmony HUB is online and within range of your devices.
5 Save and Refresh
Complete all button configurations, click Save, and refresh your Astrion Remote to apply the changes.
💡 Tip: Harmony HUB commands are not limited to IR. If your Harmony HUB is configured to control devices via Bluetooth or Wi‑Fi (e.g., Philips Hue, Sonos, or Roku), those commands will also work through this binding, giving you even greater flexibility.
Binding a Media Player Entity
Starting with V1.2.0, the TV Card can also be bound to a media player entity
(media_player). This creates a dual-page experience on your Astrion Remote:
- Page 1 — TV Controls: Directional keys (Up/Down/Left/Right), OK, and other TV controls
- Page 2 — Media Controls: Play/Pause, Next/Previous track, and media playback controls
Typical Use Case — Apple TV
Bind both the Apple TV remote entity and the Apple TV media player entity to the same TV Card. Swipe left and right on the Astrion Remote to switch between TV controls and media playback controls seamlessly.
Configuration Steps
1 Add TV Card
Add a TV Card to your dashboard as usual.
2 Bind Media Player Entity
In the TV Card configuration, locate the Media Player field
and select your media player entity (e.g., media_player.apple_tv).
3 Configure Button Mappings
Configure your button mappings for both TV controls and media controls. The card will automatically create two pages.
4 Save and Refresh
Save the configuration and refresh your Astrion Remote.
Custom IR Codes
For devices not in the built-in IR database, the TV Card supports custom IR codes. This allows you to control virtually any IR-enabled device.
Understanding the IR Code Format
The custom IR format supported by the TV Card is:
Example:

Parameter Breakdown
- 38000 — IR carrier frequency in Hz (38kHz). For most consumer electronics (TVs, set-top boxes, audio equipment), the carrier frequency is typically 38000 Hz (38kHz).
- 8973 — First pulse duration (microseconds)
- 4497 — First gap duration (microseconds)
- 560, 556... — Subsequent pulse/gap durations (microseconds)
How to Add Custom IR Codes
1 Open TV Card Configuration
Open your TV Card configuration in Home Assistant.
2 Select IR Entity
Select the IR entity provided by the Astrion Home Integration.
3 Choose Custom IR Code
In the button mapping dropdown, select Custom IR Code.
4 Paste Your IR Code
Paste your IR code string using the format described above.
5 Save and Sync
Save the configuration and synchronize the card with your Astrion Remote.
💡 Tip: If your IR analysis tool shows a frequency other than 38000 Hz,
use that value instead. For example, if your tool shows 36000 Hz with
pulses 8961, 4491, 560, 560..., your custom code would be:
36000,8961,4491,560,560,...
TV Card Features in V1.2.0
The V1.2.0 update introduced several enhancements to the TV Card for improved IR control and user experience.
Custom Background
Import custom images for your TV Card background
Optimized Naming
Improved source list naming (formerly called "Signal Source")
Media Player Binding
Bind media entities for dual-page TV + media controls
Harmony HUB Support
Bind Harmony HUB entities with select/remote modes
Astrion IR Support
Bind Astrion IR entities for local IR control
Troubleshooting
IR Entity Not Showing in TV Card
- Verify the Astrion Home Integration is installed correctly.
- Ensure your Astrion Remote is running firmware V1.2.0 or newer.
- Check that RosCard is updated to V1.2.0 or newer.
- Restart Home Assistant after installing the integration.
No Response After Pressing Button
- Verify the frequency value is included at the beginning of the code.
- Ensure values are separated by commas only — no spaces or extra characters.
- Confirm the selected IR entity is the correct one for your remote.
- Check that the target device supports IR control and is within range of the transmitter.
- Verify the IR code format matches the required structure.
Harmony HUB Not Detected
- Ensure your Harmony HUB is successfully added to Home Assistant.
- Verify the Harmony HUB is online and accessible.
- Check that the Harmony integration is properly configured in Home Assistant.
Custom IR Code Not Working
- Double-check the IR code format — it must start with the frequency value.
- Verify that the pulse/gap durations are in microseconds (μs).
- Ensure the target device is within line-of-sight of the Astrion Remote's IR transmitter.
Media Player Controls Not Showing
- Ensure you have bound a media player entity to the TV Card.
- Verify the media player entity is available in Home Assistant.
- Check that the media player supports playback controls (play/pause, next/previous).
🔧 Still Not Working? Please create a forum post and include: your IR code, the device model you're trying to control, and any error messages. Our engineering team will be happy to help analyze the issue.
Related resources
Need help with IR setup?
Our support team and community are here to assist you.